
Every product is independently reviewed and selected by our editors. If you buy something through our links, we may earn an affiliate commission at no extra cost to you.
You’ve seasoned your chicken just right, set the air fryer temperature, and waited eagerly, only to slice into the meat and find it pink in the center or overcooked and dry. The culprit? Not knowing your food’s exact internal temperature.
Cooking in an air fryer is convenient and fast, but because it cooks with circulating hot air, judging doneness visually can be misleading. Using a meat thermometer removes the guesswork, ensuring that every bite is safe, juicy, and flavorful.
In this guide, you’ll learn how to use a meat thermometer in an air fryer correctly — including the right type of thermometer, where to insert it, how to avoid damaging your appliance, and pro-level cooking tips for better results than ever.
Understanding the Problem: Why Measuring Temperature in an Air Fryer Can Be Tricky
Air fryers use rapid hot air circulation — usually between 350°F and 400°F — to cook food quickly and evenly. Because of this intense convection, meat surfaces can brown beautifully even when the interior hasn’t fully cooked. The result: misleading color cues and potentially undercooked meat.
Common Misconceptions
- “I can just go by time.” Cooking times vary by meat thickness, starting temperature, and even air fryer model. A cut that took 15 minutes yesterday could take 12 or 18 minutes today.
- “If it’s brown, it’s done.” Browning happens due to the Maillard reaction on the surface, not internal temperature.
- “Air fryers cook evenly, so thermometers aren’t needed.” True, air fryers distribute heat well — but not perfectly. The center of thicker cuts can stay cooler far longer than the edges.
When It Becomes Serious
Undercooked poultry or pork poses real health risks, while overcooked meat dries out and becomes tough. For anyone wanting both safety and perfect texture, a meat thermometer is non-negotiable.
Types of Meat Thermometers for Air Frying
- Instant-Read Digital Thermometer
- Best for quick checks after removing food from the basket.
- Reads temperature in 3–5 seconds.
- Ideal for small cuts like chicken wings, salmon fillets, or burgers.
- Leave-In Probe Thermometer (Oven-Safe)
- Includes a metal probe that stays in the meat while a cable connects to an external digital display.
- Perfect for roasts, whole chickens, and thick steaks.
- Look for silicone-coated cables rated for high heat (400°F+).
- Wireless or Bluetooth Thermometer
- Connects to your phone for real-time tracking.
- Great for monitoring large meats without opening the air fryer repeatedly.
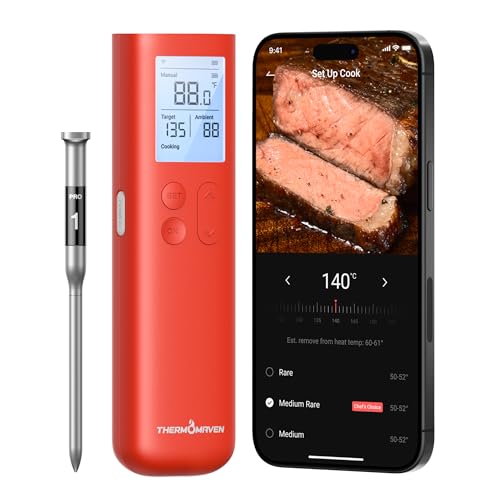
- Smart Display Base with Control: The ThermoMaven G1 wireless meat thermometer features a versatile smart display base th…
- Reliable Sub-1G Connectivity: Experience stable, long-range monitoring with our advanced Sub-1G technology, allowing you…
- NIST Certified 6-Sensor Precision: The ThermoMaven G1 digital meat thermometer features 6 sensors (5 internal and 1 exte…
Supporting Tools and Materials
- Heat-resistant gloves (for safety when checking mid-cook)
- Tongs or a meat fork
- Clean plate or cutting board for resting cooked meat
- Sanitizing wipes or soap for cleaning the probe between uses
How to Use a Meat Thermometer in an Air Fryer (Easy Steps)
Step 1: Choose the Right Thermometer for the Job
For smaller portions (like chicken strips or kebabs), an instant-read thermometer works best. For thicker cuts or whole items, opt for a leave-in probe or wireless thermometer rated safe for air fryers.
Step 2: Preheat Your Air Fryer
Preheating ensures that your cooking temperature remains stable and predictable. Just 3–5 minutes is enough for most air fryers.
Step 3: Insert the Thermometer Correctly
- For Instant-Read: Remove the basket briefly near the end of the estimated cooking time. Insert the probe into the thickest part of the meat, avoiding bones and fat pockets. Wait a few seconds for the temperature reading.
- For Leave-In Probe: Insert the probe before cooking begins. Feed the cable out of the air fryer (using the seam between basket and lid if available), making sure the wire doesn’t touch the heating element or ventilation fan.
Step 4: Check Target Temperatures
Use the thermometer to confirm that the internal temperature has reached safe cooking minimums:
| Meat Type | Safe Internal Temp (°F) | Notes |
| Chicken (whole or pieces) | 165°F | Check thickest part near bone |
| Turkey | 165°F | Avoid touching bone |
| Pork | 145°F | Let rest for 3 minutes |
| Beef (steak, roast) | 135°F–160°F | Varies by desired doneness |
| Fish | 145°F | Flakes easily when done |
| Ground meats | 160°F | Ensure no pink center |
Step 5: Let the Meat Rest
Once your thermometer shows the target temperature, remove the meat and allow it to rest — typically 3–10 minutes, depending on size. This helps the juices redistribute and the temperature stabilize.
Safety Warning
Never leave a standard instant-read thermometer inside a running air fryer. Only probes designed for continuous heat exposure should stay in while cooking.
Common Mistakes to Avoid
- Using a plastic or non-heat-safe thermometer. Air fryers reach high temperatures that can melt or damage low-heat tools.
- Touching the heating element with the cable. Probe wires can burn or short out if in direct contact with the fan area.
- Checking too early. Opening the basket too often cools the chamber, causing uneven cooking.
- Forgetting to clean the probe. Always sanitize between temperature checks to avoid cross-contamination.
Expert Tips and Real-World Insights
1. Use a Short Probe for Smaller Foods
For wings, nuggets, or shrimp, choose a thermometer with a thin, short probe so you don’t pierce through the entire piece.
2. Keep the Cable Out of the Fan’s Path
If using a cabled thermometer, gently run it along the side seam to prevent air blockage or snagging.
3. Trust the Number, Not the Color
Color depends on lighting, seasoning, and cooking method. The thermometer reading never lies.
4. Try Spot Checks
If cooking multiple pieces, check the thickest and most central item for accuracy.
5. Use Carryover Cooking to Your Advantage
Remove meat when it’s 3–5°F below target; it will continue cooking as it rests.
The Simple Science Behind Meat Thermometers
When meat cooks, its proteins denature and coagulate, forcing out moisture. The thermometer doesn’t just measure “hotness” — it signals when dangerous bacteria like Salmonella and E. coli are neutralized.
At 165°F for poultry and 145°F for fish or pork, these pathogens no longer survive. A thermometer gives you scientific precision, not visual guessing.
DIY vs. Commercial Thermometers: Which Is Better?
| Type | Pros | Cons |
| Instant-Read Digital | Fast, affordable, highly accurate | Must open air fryer to check |
| Leave-In Probe | Continuous monitoring, great for roasts | Cable management can be tricky |
| Wireless Bluetooth | Hands-free, app alerts, perfect for multitasking | Higher price, needs batteries |
Verdict: If you air fry daily, invest in a reliable digital probe model. It’s safer than pulling hot baskets out repeatedly and gives you professional-level consistency.
When to Replace Your Thermometer
You might not need a repair specialist for your air fryer, but it’s wise to replace your thermometer if you notice:
- Inconsistent readings (drastic temperature fluctuations)
- Cracked display or damaged probe ends
- Melted or frayed cables
- Long response time (5+ seconds on instant-read)
Accurate temperature readings are key not just for taste — they protect your health.
Cost, Time, and Effort Considerations
- Cost: Quality digital thermometers range from $15–$50. Wireless options go higher but offer more convenience.
- Time: Checking temperature takes under 10 seconds with practice.
- Effort: Minimal — just keep your tools clean and stored safely after each use.
The small investment pays off in food quality and peace of mind.
Extra Tips and Preventive Maintenance
- Store your thermometer in a drawer away from moisture and heat.
- Replace batteries yearly for digital models.
- Calibrate occasionally by testing in ice water (should read 32°F) and boiling water (should read 212°F).
- Avoid soaking electronic parts — only wipe the probe end with soapy water.
Maintaining accuracy extends your thermometer’s life and ensures reliable cooking every time.
Frequently Asked Questions
1. Can I use a regular oven thermometer in an air fryer?
No. Regular oven thermometers measure the air temperature, not the food’s internal temperature. You need a food-safe meat thermometer for accurate readings.
2. Can I insert the thermometer while the air fryer is running?
Only if your probe and cable are heat-safe and designed for continuous use. Otherwise, pause the machine, pull out the basket slightly, and check safely.
3. How do I check temperature without losing heat?
Use a leave-in probe or wireless thermometer. If using an instant-read, check quickly and close the basket immediately.
4. Why do my temperature readings vary between pieces of meat?
Different thicknesses, fat content, and positioning inside the basket affect heat exposure. Always check the thickest piece.
5. My meat reached the correct temperature but still looks pink — is it safe?
Yes, particularly with pork or poultry smoked or air fried at high heat. Chemical reactions can keep some pink coloring, even when fully cooked.
6. What’s the best thermometer brand or type for beginners?
Look for a compact digital model with a backlit display and fast response time. Avoid overly complex Bluetooth versions until you’re comfortable with basics.
Practical Example: Checking Air Fryer Chicken Breast
- Preheat your air fryer to 375°F.
- Insert a leave-in probe into the thickest part of the chicken.
- Place breast in the basket, running the probe wire outside safely.
- Set the air fryer for 16–18 minutes.
- Check the display — once it reaches 163°F, remove and rest for 3 minutes (temperature will rise to 165°F).
- Slice and enjoy perfectly moist, safe chicken.
Conclusion
Mastering how to use a meat thermometer in an air fryer turns guesswork into confidence. No more cutting into food prematurely or worrying about undercooked centers — just consistent, restaurant-quality results every time.
Here’s what to remember:
- Choose the right thermometer for your food type.
- Always aim for verified safe internal temperatures.
- Clean and maintain your tools for accuracy and safety.
- Use resting time to lock in juices and maximize flavor.
With these steps, your air fryer becomes not just a convenience appliance but a precision cooker — one that delivers perfectly done meals, every single time.